Follow us


There are many photo effects in Album Xpress software t hat allows the user to create an own personalized album template such as light leaks, Mask effect, Decor, and face composition. These templates not only beautify the pictures but also give the album template a wholesome look. Among these, the Layer Mask Effect is generally used when the user wants his album template to contain various pictures in a different fashion. Let’s talk about creating a good page designing using Layer Mask Effect in AlbumXpress:
What is The Layer Mask Effect?
The layer Mask effect in Album Xpress is a reversible way to control the visibility of the pictures and hide or edit particular parts of those pictures. This gives your more editing flexibility than permanently erasing or deleting that part of the image. Think of them as filters that let the user control the impact of the changes made to the image. Just like one changes ordinary filters to determine how the pictures look, a layer mask edits a picture in the most fun and beautiful way possible.
In Album Xpress, the Layer Masking effect is applied through various artistic brushes that give the user power to apply different styles of masks at once to different images.
Why use the Layer Mask Effect?
Layer Mask has lots of benefits, like the fact that you can work on your image without affecting the pixels. But perhaps the most powerful aspect of the layer mask is your ability to affect exactly where, how, and how much of your changes will affect the image. It allows the user to create dynamic, good-looking album designs which show deeper meanings of the pictures. Layer masks are right up there at the top of the list of things the user needs to know about when working with Album Xpress because they enhance the work and the creativity of the album designing. The layer masks are so incredibly simple and easy to understand!
How to apply the Layer Mask Effect?
Select a Photo
-Add a photo from the gallery on your Album Page
-Scale, Position, and Rotate it the way you want it to be set
Adding the Mask Layer
-Select the “Mask” Option on the Upper panel
-Click on the “Layer Mask” button on the left side of the panel
-You will see a series of brushes for selection in the middle
-Select a brush of your choice and start designing
Designing the Layer Mask
-Shape the photo using the Layer mask Brush
-“Rotate” or “Flip” the brushes as you want
-If you don’t want a layer, select the Layer and click on “Remove”
-You can also control the “Size”, “Opacity” and “Flow” of the brushes by clicking on the following options on the right side of the page.
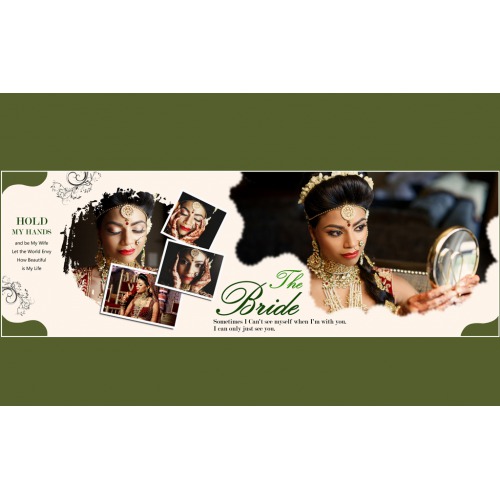
Making a complete Album Template
-Further, you can Add various photos,
-Edit them using the layer mask effect
-Add text and complete your own Album Page/Template
If that sounds confusing, don’t worry, here is a complete tutorial video, click here to watch. Get started now.